This content was last updated on 08/23/2024
Contents:
- Log in to WolfWare
- Create a WolfWare space
- Activate WordPress
- Manage settings
- Save and view
- Set WordPress as home page
1. Log in to WolfWare
Log in to https://wolfware.ncsu.edu with your Unity credentials. Your classes for the current semester are displayed under the Current tab. The other tabs show other semesters and any project spaces that you have access to. In order to use WordPress or any of the other course tools, you must first have a course or project space in WolfWare.
2. Create a WolfWare space
You can create a WolfWare space for an academic course for which you are listed as an instructor. You also have the option of creating a WolfWare space for a project or training that is not tied to an academic course and does not charge a fee.
(Note: If you are already using other tools such as Moodle in an existing WolfWare space, you can add WordPress to that space. To learn how, skip ahead to the section Activate WordPress.)
Request a COURSE space
If you do not currently have a WolfWare space for an academic course that you teach, follow the steps to create a WolfWare Course space.
Request a PROJECT space
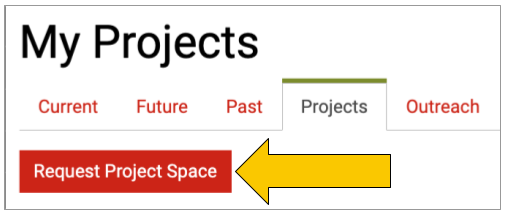
WolfWare Project Spaces can be used in a variety of ways; for example, to develop or revise a Moodle course, to facilitate communication within a team or group, or to practice privately with online tools. To request a new project space, follow these steps to create a WolfWare Project space:
- On the “My WolfWare” page, click on the “Projects” tab.
- Click the “Request Project Space” button.
- Review the WolfWare Project Space policies and complete the request form.
- Enter a name for the Project Space.
- Click the “Request Project Space” button.
3. Activate WordPress
Once you have created a WolfWare space, you can activate WordPress in it.
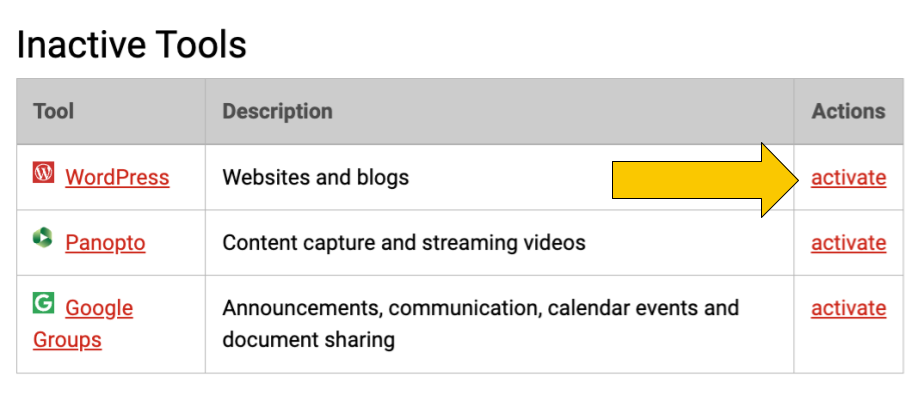
- If you are not already on the “Course Management” page for your space, click on the gears icon to the right of the space name to navigate to it.
- Under “Inactive Tools”, find WordPress on the list and click on the “activate” link in that row. This will take you to the WolfWare WordPress settings page.
4. Manage WordPress settings
There are some site-level WordPress settings that can only be managed in WolfWare.
- Base Name: The Base Name is part of the URL for your WordPress site. For a Course space, select from the available base names. For a Project space, you may use the default space name or enter a custom Base Name. IMPORTANT: The Base Name can only be set once.
- Tagline: This is an optional subtitle that will appear underneath the space name in the header of your WordPress site. You may leave the Tagline blank and edit it later if you wish.
- Availability: Select the date range when viewers may access your WordPress site. You may leave the end date blank.
- Visibility/Access: This setting determines who can view your WordPress site.
- Select Public to allow anyone with a link to your WordPress site to view it without being prompted to log in
- Select Users & Rosters to allow only users associated with this WolfWare course or project space to access your WordPress site. They will be prompted to log in using their Unity credentials.
- Comment Preferences: Select whether you want to allow commenting on posts and pages. If you select “Yes,” you must also select how comments will be moderated.
- Email Preference: Select whether you would like to receive an email whenever a comment is posted, or only when a comment is held for moderation.
- Community Preferences: Select whether users other than instructors can create post content.
- WordPress Site Copier: Allows you to copy content from an existing WolfWare WordPress site that you have access to (“source site”) and overwrite the existing content in the current site.
5. Save and view
When you are finished managing settings, click the “Update WordPress Settings” button to save them. It will take a few minutes to create the WordPress site. When it is ready, the WordPress Settings page will display two links above the “Tagline” setting box:
- Click on “Go to WordPress Space” to see the website as it will appear to viewers. You will see some default content that you will be able to change.
- Click on “Go to WordPress Admin” to access the admin interface, where you can edit the content that appears on the website.
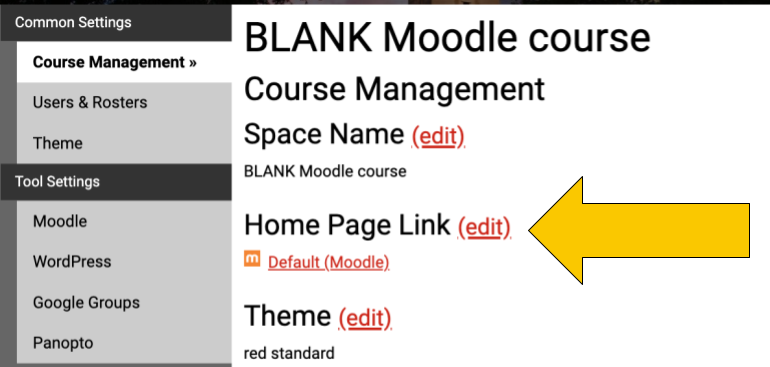
6. Set WordPress as your course home page
If you have other tools active in your WolfWare space, such as Moodle, you have the option to set your WordPress site to be the default home page for your course so that when students click on the course name in WolfWare, they will go directly to the WordPress site.
- In WolfWare, select the course or project and click on the gears icon to go to the “Course Management” page.
- Under the section “Course Management” you will see the “Home Page Link” setting. Click the “edit” link.
- Click on the dropdown menu and select “WordPress.”
- Click “Save.”