
Microscopes and Cells
Scroll below for In Person lab information.
For all In Person BIO 183 lab units – Read along in your lab handout with the information in this webpage. Fill in and answer all questions accordingly in your lab handout. Your lab handout will be collected and graded later.
Microscopes and Cells Lab Handout – Includes areas for your labeled drawings and answering questions. Please bring a paper copy of the Lab Handout to lab OR bring your laptop/tablet and paper and pen/pencils to make your drawings in lab. They will later need to be inserted as jpg or pdf images in your Lab Handout.
COVID_19 Safety Precautions for Compound Microscope Use – directions and supplies will be provided at each student table for use in the Laboratory.
The Compound Light Microscope

Helpful Links
Microscope Key Points, Diagrams, and Quizzes(opens in new window)
How to use the microscope video(opens in new window)
The (opens in new window)Virtual Microscope(opens in new window) developed by the NC Community Colleges BioNetwork
Appendix A(opens in new window) of BIO 181/183 Lab Manuals – Use and Care of Microscopes
Exploring Magnification: Power of Ten video(opens in new window)
Microscope use reminders
- Always start by using the 4X objective lens. Find the specimen and focus using the coarse focus, then the fine focus knob. Only use the coarse focus know with the 4X objective lens. Then progress to the 10X objective lens, then 40X lens and oil/100X lenses. Be sure to focus at EACH new objective lens (10X, 40X, 100x) using ONLY the fine focus knob. Do not skip using a lens. Always progress one lens at a time.
- Label all drawings with organisms name and indication of size: total magnification, field of view, size bar, or lens used in relation to the field of view. Total magnification = object lens x ocular lens.
- Other information: date, time, place and any relevant notes.
- Record all observations; don’t rely on memory.
- Make sure to record what you SEE, not what you THINK you should see.
- Detail is key, pay attention to even the smallest things.
Activity 1: Procedure 1A Practice Use of the Compound Microscope Using a Prepared Slide
- Review the names and use of all the major parts of the microscope and use of lens paper needed for microscopy. This light microscope has a 10X ocular lens and 4 different objective lenses (4X, 10X, 40X and 100x/oil lens), though we will not use the 100X oil lenses in our labs.
- Select ONE of the prepared slides found at your table. Use the course focus to find the specimen with the 4X lens. First use the Course Focus, then the Fine Focus adjustors to see the best image of the specimen. You may need to adjust the level of light intensity and/or iris diaphragm to most clearly see the specimen. Continue to increase magnification until you can best see the cells.
- Draw a few of the cells in the indicated circles in your lab manual. Keep in mind to draw the cell size in relation to the field of view. Indicate the name of the slide, total magnification you thought was most appropriate, and any structures you can discern. You can search the internet to help with labeling 2 structures within the image you choose to draw,
- Answer the questions found in the lab handout/Lab Unit write up.
- Class Discussion – Below are images of bacteria, animal, plant and fungal cells. What visual clues can you see to help you determine if they are bacterial, animal, plant or fungal cells? Think back to BIO 181 labs or characteristics of cells belonging in different Kingdoms. What information is useful? What else would you need to know when looking under a light microscope?
Follow the directions in the lab handout/write up
1.  | 2.  | 3.  |
4.  | 5.  | 6.  |
Activity 1: Procedure 1B Simple Staining with Animal and Plant Cells (Eukaryotic Cells)
Simple staining is the addition of ONE type to stain that can allow you to better see cells and/or structures under the light microscope.
In lab you will make your own slides of cheek and onions cell slides. On their own, these cells are relatively clear so we will use Toluidine Blue stain to better visualize the them. You will need to view the cells at low, medium, and high power (4X, 10X, and 40X objective lenses) to determine the most appropriate magnification for each of these cells.
- Students will work in pairs, with one student making the cheek cell slide and the other making the onion cell slide. The other pair of students at the table should ALSO be making these same slide so that everyone builds their microscope and observational skills.
If you are wearing a mask and are uncomfortable removing it to sample your cheek cells in the lab, you can go OUTSIDE on the breezeway with a toothpick to collect your own cheek cells.
How would you describe the animal cells? The plant cells? Size, shape organization? What structures and organelles can you see that help you identify the type/kingdom of these cells? What cellular organelles can’t you see? Why can’t you see them? What is the best size to view these animal and plant cells?
Activity 2: Procedure 2A Osmosis in Plant Cells (Elodea)
- Decide which magnification is most appropriate and draw both in the appropriate location in your lab handout.
- Be sure to label the structures that you can see in each these specimen. At a minimum, you should be able to label 2 structures found in these cells.
- Based in these slides, how are these cells similar? How are they different?
Elodea is an aquatic plant that provides habitat and oxygen for many organisms in freshwater lakes, ponds and low flow areas in streams. It is commonly used in freshwater fishtanks and biology labs!
a.  . b.
. b. 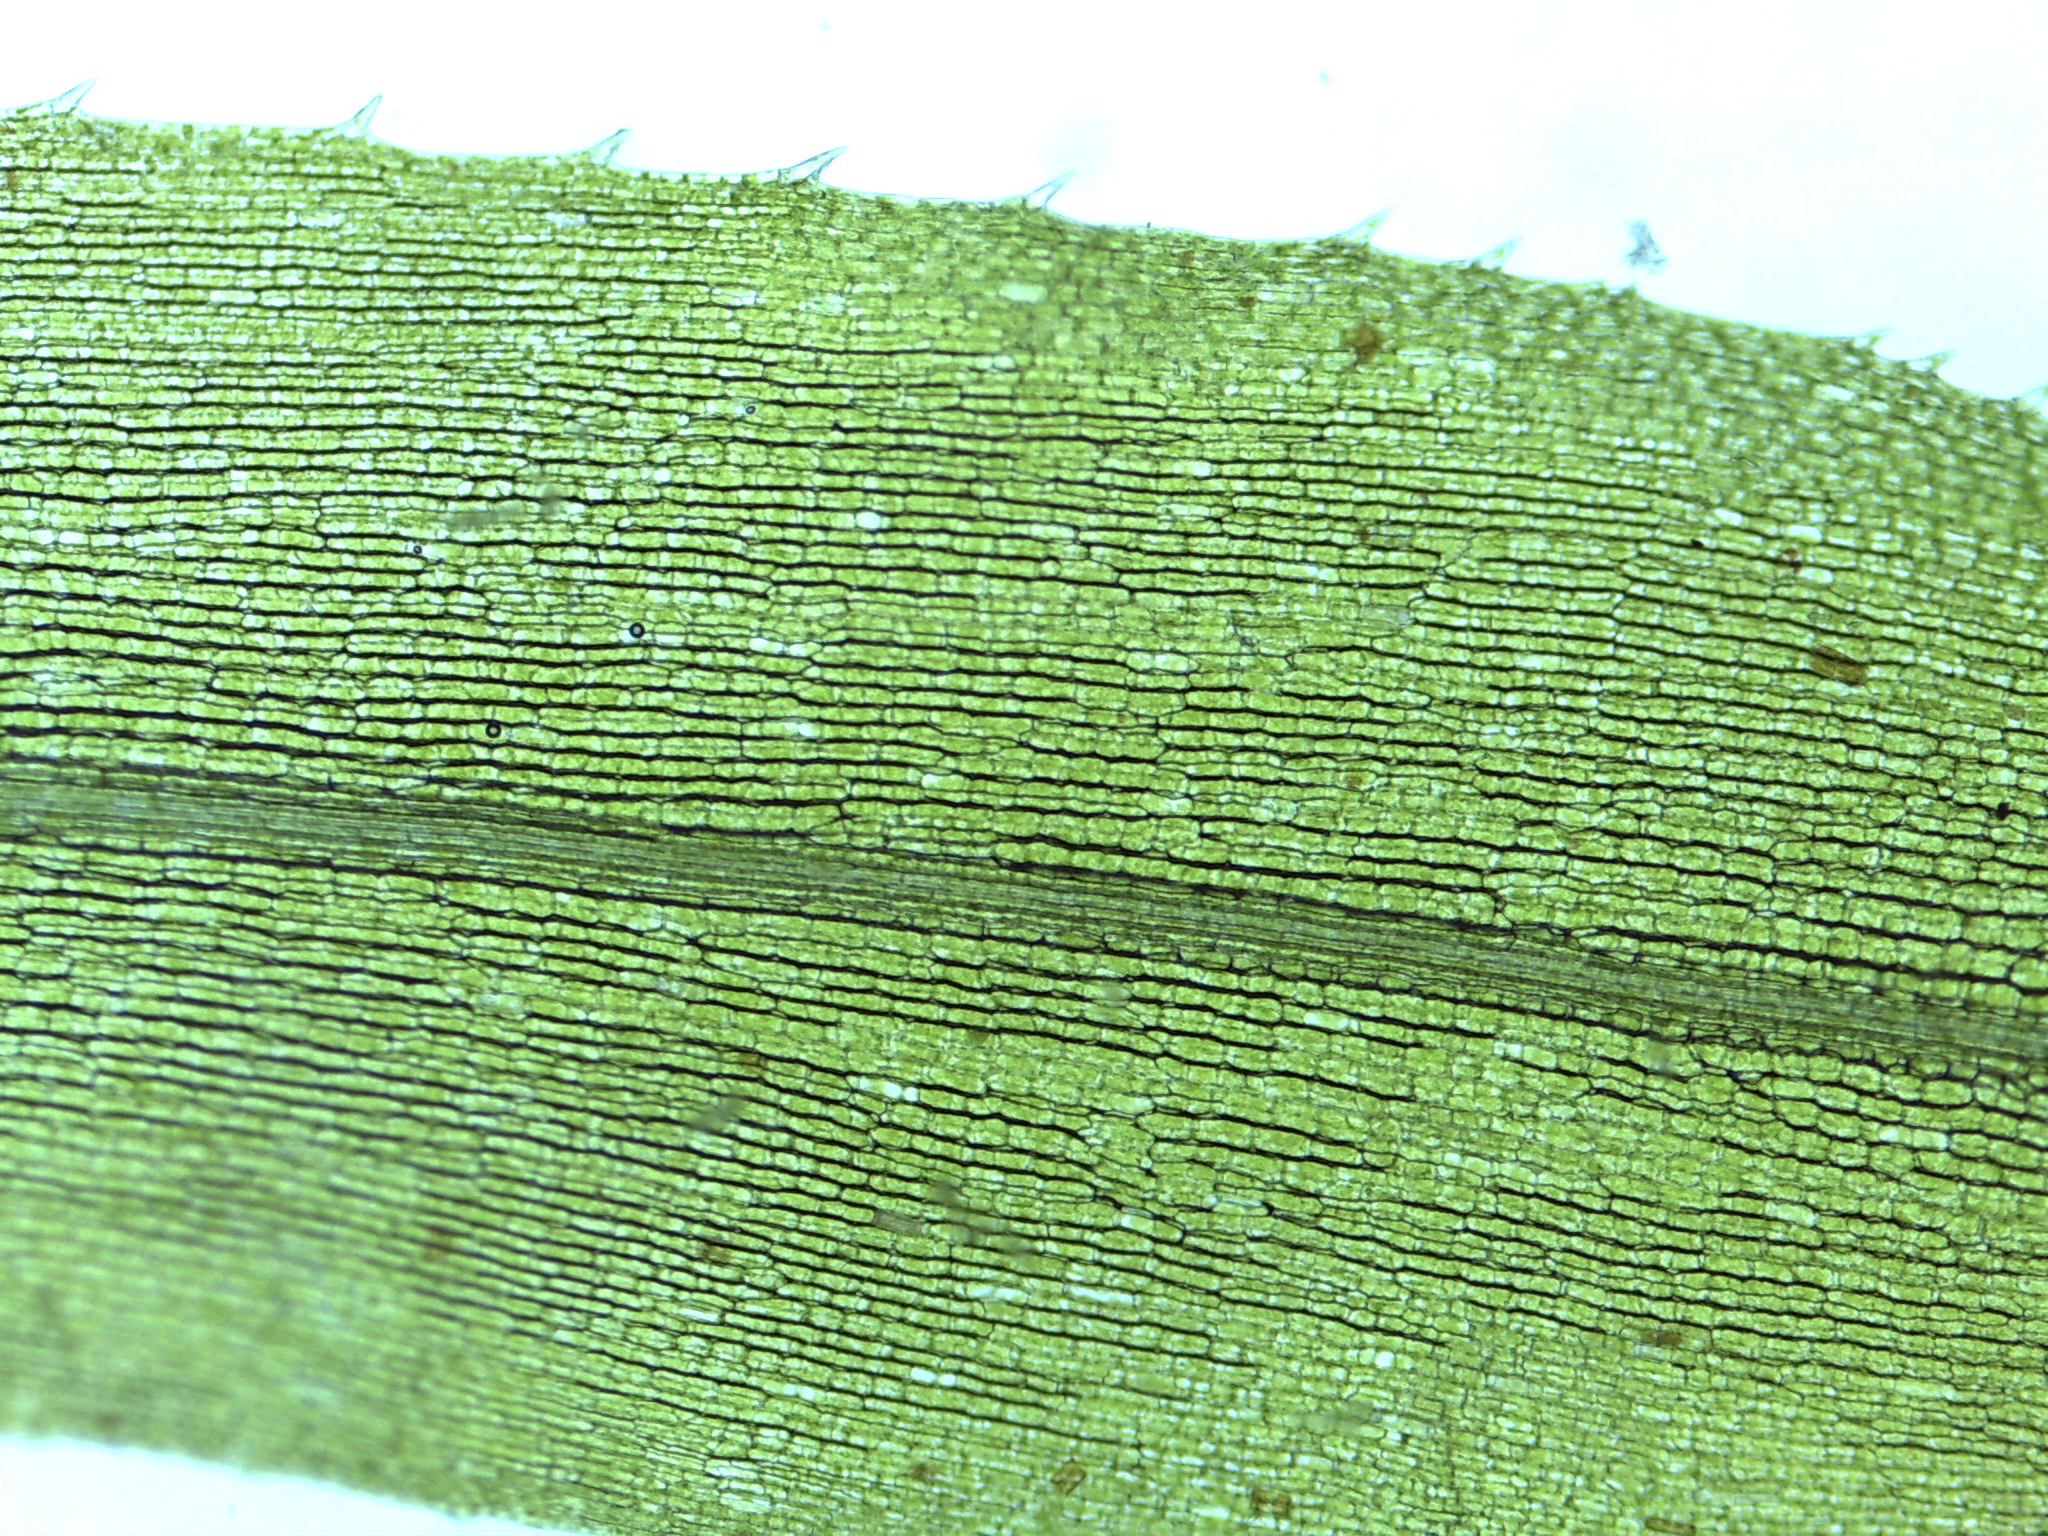
- Each pair of students will need to obtain 1 whole leaf of Elodea off the main stems from the side counter culture (a). Then make a wet mount slide taking care not to introduce air bubbles under your coverslip. Above in “b” you can see a whole leaf mounted using freshwater at 40X total magnification. What structures can you see here? …. not much! Higher magnification is needed to clearly see whole cells.
- Draw the Elodea cells at the appropriate magnification in the leftmost circle in your lab handout. Label all the structures you can see.
- Your TA will assign each pair of students either the 5% and 10% Saline (NaCl) treatment to flush the leaves with different concentrations of saline.
- Draw your saline flushed cells. Label all the structures you can see. Make note of any changes that you see.
- Then flush the cells with freshwater (dH20) and draw the cells. Once again label all the structure you can see and make note of any changes that you see.
- Answer the questions 7-9 in your lab handout.
Activity 2: Procedure 2B Osmosis in Blood Cells

- Working in pairs and as a table, follow the directions in your Lab Handout.
- Each pair of students will make one slide to see blood cells in 0.87% Saline and in 5% saline. First add a very small drop of the 0.87% saline on one end of the slide and your TA will add 0.1 ul of blood to that drop. Add a coverslip and observe, then draw what you see.
- Then add a very small drop of 5% saline to the other end of the same slide. Again, your TA will add 2 ul of blood to this drop. Add a coverslip and observe, then draw what you see.
- Lastly, view the blood cells in dH2O. If there is room on your slide for 1 more cell prep, go ahead and add a tiny drop of water, then 0.2 ul of blood cells and a coverslip and quickly view the cell preparation. If needed you use another slide to make this last blood cell preparation.
- As a pair, the students should both be viewing these slides and making their own sketches.
- Overall, the blood cells should be observed under 3 different environmental conditions: dH2O, 0.87% saline and 5% saline.
- Draw, label and explain what you see under all 3 conditions using the appropriate osmotic terminology: isotonic, hypotonic and hypertonic.
- It may be hard to see the red blood cells once they have been in the dH2O for a while. Viewing the Osmosis in Red Blood Cells video below may be helpful – especially starting 2:51.
- Also be sure to answer any other written questions.
Videos of Osmosis in a different plant cell and blood cells:


Activity 3: Animated Film – The Inner Life of the Cell
Video: Cellular Visions: Inner Life of the Cell video (3:12)- Read the summary below before you watch the video. Click on the link and scroll down and click the play video arrow.
Video Background: This video starts with a view of the inside of a blood vessel. You will see the red blood cells rushing past and the much larger white blood cells rolling along the wall of the blood vessel. The white blood cell receives an extracellular signal and the majority of the video shows what happens inside the white blood cell as it responds to that signal. The final scene shows the white blood cell reshaping (due to the conformational changes of the cytoskeleton) and slipping through the endothelial cells of the blood vessel wall to the site of inflammation.
As you watch the video, how many structures/organelles can you see? Can you find -protein filaments, lipid rafts, plasmamembrane, actin filaments, microtubules, motor proteins, transport vesicles, mitochondria, centrosomes, nucleus, nuclear pore, mRNA, ribosomes making proteins, ER, golgi apparatus, vesicles transported back to the plasma membrane surface.
Completed Microscopes & Cells Unit 1 Lab Handout (all pages) due in Moodle 24 hours after lab
Be sure to answer all questions found throughout the lab handout and the end, and insert your labeled sketches in your handout. Any images in your Word Document should be saved as JGPs. HEIF/HEVC iPhone images and items saved as Pages may appear blank in Moodle for your TA (so can’t be graded).
Group Work Contract
Complete the linked Group Work Contract template as a group. This contract will serve as guidelines for all your graded group work in lab.
Please complete the template within 48 hours of the in-person lab. It will help you plan and complete ALL group work due by Friday 11:59PM of the Online Lab weeks and work on your Pathogen Project.
Leave a copy of the completed form in your Lab Group Work Google folder.
Your TA will review this. The group can edit it at any time as long as the whole group agrees. Let your TA know if you make changes.
Semester Long Pathogen Group Project
Click on this box to link to the Pathogen Project Webpage. Your TA will assign groups this week and a Group Project Proposal with supporting information is due by Friday 11:59PM of the Off Lab Week following the Microscopes and Cells Lab.
Overview of Cell Structures – nice video with clear explanations of cellular structures, organelles and function (7:28).
Cool Volume Electron Microscopy imaging:
- 3D Reconstruction of Chlamydomonas reinhardtii – short videoclip
- 3D Reconstruction of a mouse brain – short videoclip
Article: NCSU Researcher “Stopping Cancer in its Track”(opens in new window) – Examines the role to which the cytoskeleton/actin is involved in movement of cancer cells. Remember “moving through” the cytoskeleton in the Inner Life of the Cell video above?
NCSU – Cellular and Molecular Imaging Facilities(opens in new window) (CMIF) – Galleries(opens in new window) – Click on the Galleries link to see a variety of images created from a variety of different types of microscopes, light, filters, stains and sample preparation.
NCSU – Analytical Instrumentation Facility (AIF)(opens in new window) – BIO EM Images(opens in new window). This facility is located on Centennial Campus and offers short courses and information on a variety in microscope imaging technologies. ck links
Exploring the World of Optics and Microscopy(opens in new window) – nice website featuring a wide variety of microscope technologies and images.
Course Modifications for Cells and Microscope Lab with Bacterial Projects: (not done Summer 2025)
Bacterial (Prokayotic Cells) Gram Staining Protocol Handout (not in your lab manual) – incorporate into lab handouts and define new activities for student pairs.
For this modification, the Make Up Module does not include information on bacterial cells walls and gram staining…..
Gram Staining:


Bacterial outer cell wall structure:
